
A fellow member of the Rose City Model Sailing Club ordered a Micro Magic Racing Carbon Edition kit. This 21″ German boat is extremely popular in Europe and is achieving an ever-growing following in the USA. Even before he completed his build, I knew I had to have one. I ordered one in February 2011 “for mid-March delivery”. Near the end of June 2011, with the Carbon Edition still on backorder, I contacted Graupner USA and changed my order to the “vanilla” Micro Magic Racing kit and it shipped the same day. I have begun my building project and have added a few pics of the start of that project. More will follow. The RCMSC officers decided to add the Micro Magic as a Club supported boat class (along with Footys). Two members now own Micro Magics, I’m building mine, and I know there are more coming along.
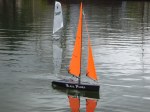
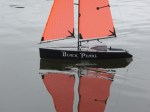
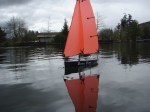
I don’t intend to put together an elaborate, thorough build log for my Micro Magic, as that would be reinventing Peter B’s excellent wheel. Here’s a link to Peter’s build log. Rather, I intend to pass along some tips (below the photos) that occur to me during the build and to document modifications I’ve made. Following the pics of my build are some nice pics (by Greg) of Ted’s beautiful Black Pearl and a nice pic of Micro Magics sailing French waters.
-
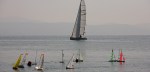
- Micro Magics in France
-
- Stalked by a Tiger Shark

-

- Nice
-

- Close Hauled
-
- Reflection
-
- Threatening Skies
-
- Next step: Get’er wet!
-

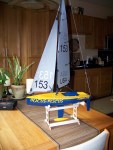
- Close hauled view.
-

- Battery pack velcroed to hull bottom. Rx velcroed to battery pack.
-

- I elevated the jib sheet tie-off w/ a toothpick post for a better angle to the arm pulley.
-
- Rudder pushrod seems to work great. On/off switch in the up (off) position.
-
- The Germans drove me to drink a few times with their instructions and drawings.
-

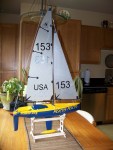
- I’m done!
-

- Vinyl graphics by my friend Del @ G-Scale Graphics.
-

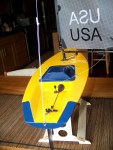
- Painted (finally!) – not perfect but it will have to do.
-

- Deck and keel bulb painted Reefer Yellow. Hatch cover, hull and keel fin will be Blue Angel Blue.
-

- End view of rudder pushrod.
-

- Side view of rudder pushrod.
-

- Rudder pushrod: 0.050″ carbon fiber rod through bulkhead and rubber boot.
-

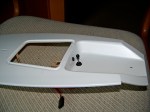
- Deck glued to hull with Testors Red. By far the scariest part so far. Fingers crossed.
-

- Another view of the switch assembly.
-

- Underside view of switch.
-
- And on position.
-

- Waterproof pushrod on-off switch, off position. See Tip #3.
-
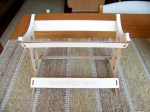
- Stand w/ light coat of clear lacquer. See Tip #1.
-
- See my Pool Shark 3D page for particulars on the Mylar tape method.
-

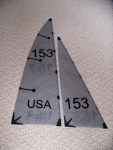
- 153 and USA applied with Mylar tape using Carl Hansen’s method.
-

- My kit has arrived!
MICRO MAGIC BUILDING TIPS:
Tip #1: Yes sir, ladies and gentlemen, I made my first mistake. Before breaking out the laser-cut plywood parts, use an X-acto knife to cut at least part way through the little uncut tabs that hold them into the sheet. Do this from both sides. I broke out chunks from the surface of a couple of the stand pieces before I realized my mistake. Cosmetic, but hey?
Tip #2: After considerable wringing of hands and gnashing of teeth, here are the adhesive choices I am going forward with. For plastic-to-plastic, Testors Cement for Plastic Models (red tube). For wood-to-wood, Titebond III. For plastic-to-wood, Marine GOOP. So far, so good, but I’ll let you know if this changes.
Tip #3: I decided I didn’t want to have to remove the hatch cover to turn the boat on and off. Ted’s solution was a waterproof boot over a deck-mounted slide switch. I wasn’t able to find such a boot (w/o paying more for shipping than for the part) so I went to Tammies and bought a waterproof through-deck pushrod switch actuator. The pictures don’t show this very well. There’s a nylon rack mounted under deck that holds a simple slide switch vertically. It mounts through the deck (3/16″ hole) with a hollow nylon hex-head screw bushing that threads into the rack below. I chose to drill this hole through the sail servo mounting tab for added reinforcement. The pushrod actuator goes through this from above and screws into a cap that fits over the switch tab, allowing push and pull to throw the switch. I decided on “down=on”. A tiny bit of added weight. I might trim the rack that would otherwise hold the switch (and the 3rd servo I won’t be using) to compensate somewhat.
Tip #4: No pics to go along with this one yet, but PLEASE make sure your keel fin and adapters fit in the keel trunk before you glue deck to hull. I think it’s almost certain that you’ll have to sand the portion of the fin that goes into the trunk and all of the adapter pieces to fit. I had to sand quite a bit. Before I had sanded quite enough, I tried to force fit and split the glued seams of the trunk 😦 I re-glued the trunk and then sanded a bunch more. Finally got a good fit. If I had done this after the deck was on, it would have been very hard to (a) determine that I had split the trunk, and (b) repair it if I had.
Tip #5: Don’t be stupid like me! I obviously cemented the wrong nuts to the underside of the deck 😦 The Part 24 captive nuts are the ones with the knurled collar, not the round topped ones I cemented in place. Though they are both threaded the same, the round headed ones I used are some sort of self-locking nut and have some rubber or other substance in the threads that make it VERY difficult to get the ring screws (Part 34) to thread into them. With great effort, I got the fore, aft and starboard side ring screws threaded and in place. I have decided to follow the lead of others and forego the use of shrouds, so I really only need one of the shroud ring screws for the mainsail downhaul line. The lock nuts I misused were intended for assembly of the rigging – luckily I had enough of them to complete this.
Tip #6: Having just finished the build, I know I would have an easier time and have a better result if I built another MM soon. I won’t be doing that, but it would be nice. I may add some more tips as my thoughts settle.
